Compressibility factor variation from the van der Waals equation by three different approaches

| categories: ode, autograd, python, nonlinear algebra | tags:

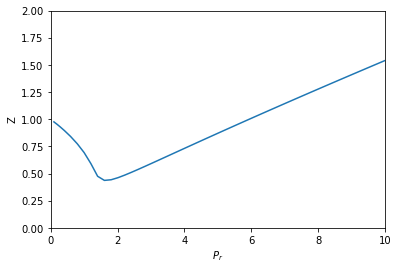
In the book Problem solving in chemical and biochemical engineering with POLYMATH, Excel and Matlab by Cutlip and Shacham there is a problem (7.1) where you want to plot the compressibility factor for CO2 over a range of \(0.1 \le P_r <= 10\) for a constant \(T_r=1.1\) using the van der Waal equation of state. There are a two standard ways to do this:

  1. Solve a nonlinear equation for different values of \(P_r\).
  2. Solve a nonlinear equation for one value of \(P_r\), then derive an ODE for how the compressibility varies with \(P_r\) and integrate it over the relevant range.

In this post, we compare and contrast the two methods, and consider a variation of the second method that uses automatic differentiation.

1 Method 1 - fsolve

The van der Waal equation of state is:

\(P = \frac{R T}{V - b} - \frac{a}{V^2}\).

We define the reduced pressure as \(P_r = P / P_c\), and the reduced temperature as \(T_r = T / T_c\).

So, we simply solve for V at a given \(P_r\), and then compute \(Z\). There is a subtle trick needed to make this easy to solve, and that is to multiply each side of the equation by \((V - b)\) to avoid a singularity when \(V = b\), which happens in this case near \(P_r \approx 7.5\).

from scipy.optimize import fsolve
import numpy as np
%matplotlib inline
import matplotlib.pyplot as plt

R = 0.08206
Pc = 72.9
Tc = 304.2

a = 27 * R**2 * Tc**2 / (Pc * 64)
b = R * Tc / (8 * Pc)

Tr = 1.1

def objective(V, Pr):
    P = Pr * Pc
    T = Tr * Tc
    return P * (V - b) - (R * T)  +  a / V**2 * (V - b)


Pr_range = np.linspace(0.1, 10)
V = [fsolve(objective, 3, args=(Pr,))[0] for Pr in Pr_range]

T = Tr * Tc
P_range = Pr_range * Pc
Z = P_range * V / (R * T)

plt.plot(Pr_range, Z)
plt.xlabel('$P_r$')
plt.ylabel('Z')
plt.xlim([0, 10])
plt.ylim([0, 2])
(0, 2)

That looks like Figure 7-1 in the book. This approach is fine, but the equation did require a little algebraic finesse to solve, and you have to use some iteration to get the solution.

2 Method 2 - solve_ivp

In this method, you have to derive an expression for \(\frac{dV}{dP_r}\). That derivation goes like this:

\(\frac{dV}{dP_r} = \frac{dV}{dP} \frac{dP}{dP_r}\)

The first term \(\frac{dV}{dP}\) is \((\frac{dP}{dV})^{-1}\), which we can derive directly from the van der Waal equation, and the second term is just a constant: \(P_c\) from the definition of \(P_r\).

They derived:

\(\frac{dP}{dV} = -\frac{R T}{(V - b)^2} + \frac{2 a}{V^3}\)

We need to solve for one V, at the beginning of the range of \(P_r\) we are interested in.

V0, = fsolve(objective, 3, args=(0.1,))
V0
3.6764763125625461

Now, we can define the functions, and integrate them to get the same solution. I defined these pretty verbosely, just for readability.

from scipy.integrate import solve_ivp

def dPdV(V):
    return -R * T / (V - b)**2 + 2 * a / V**3

def dVdP(V):
    return 1 / dPdV(V)

dPdPr = Pc

def dVdPr(Pr, V):
    return dVdP(V) * dPdPr

Pr_span = (0.1, 10)
Pr_eval, h = np.linspace(*Pr_span, retstep=True)

sol = solve_ivp(dVdPr, Pr_span, (V0,), dense_output=True, max_step=h)

V = sol.y[0]
P = sol.t * Pc
Z = P * V / (R * T)
plt.plot(sol.t, Z)
plt.xlabel('$P_r$')
plt.ylabel('Z')
plt.xlim([0, 10])
plt.ylim([0, 2])
(0, 2)

This also looks like Figure 7-1. It is arguably a better approach since we only need an initial condition, and after that have a reliable integration (rather than many iterative solutions from an initial guess of the solution in fsolve).

The only downside to this approach (in my opinion) is the need to derive and implement derivatives. As equations of state get more complex, this gets more tedious and complicated.

3 Method 3 - autograd + solve_ivp

The whole point of automatic differentiation is to get derivatives of functions that are written as programs. We explore here the possibility of using this to solve this problem. The idea is to use autograd to define the derivative \(dP/dV\), and then solve the ODE like we did before.

from autograd import grad

def P(V):
    return R * T / (V - b) - a / V**2

# autograd.grad returns a callable that acts like a function
dPdV = grad(P, 0)

def dVdPr(Pr, V):
    return 1 / dPdV(V) * Pc

sol = solve_ivp(dVdPr,  Pr_span, (V0,), dense_output=True, max_step=h)

V, = sol.y
P = sol.t * Pc
Z = P * V / (R * T)
plt.plot(sol.t, Z)
plt.xlabel('$P_r$')
plt.ylabel('Z')
plt.xlim([0, 10])
plt.ylim([0, 2])
(0, 2)

Not surprisingly, this answer looks the same as the previous ones. I think this solution is pretty awesome. We only had to implement the van der Waal equation, and then let autograd do its job to get the relevant derivative. We don't get a free pass on calculus here; we still have to know which derivatives are important. We also need some knowledge about how to use autograd, but with that, this problem becomes pretty easy to solve.

Copyright (C) 2018 by John Kitchin. See the License for information about copying.

org-mode source

Org-mode version = 9.1.13

Discuss on Twitter

Solving nonlinear algebra problems with internal state information

| categories: python, nonlinear algebra | tags:

In engineering, we often need to solve an equation in one variable, and then use the solution to compute other variables. For example, we might want the bubble point temperature of a mixture, and then to determine the composition of the vapor phase that has formed. In other words, we compute the temperature, and then have to use it in a subsequent step to get the composition. Here is a bubble point computation adapted from example 10.2 in Smith and van Ness, Introduction to Chemical Engineering Thermodynamics.

Given a solution of acetone (x1=0.3), acetonitrile (x2=0.45) and nitromethane (x3=0.25) at a total pressure of 80 kPa, compute the bubble point temperature and gas phase composition.

The key here is to find a temperature where the gas-phase mole fractions sum to one. The gas phase mole fractions are defined by:

\(y_i = x_i Pvap_i(T) / P\)

The typical way I would teach students how solve this looks like this. It uses the Antoine equation coded below to estimate the vapor pressure of each component as a function of temperature, and then uses fsolve to find a temperature where the gas-phase mole fractions sum to one.

import numpy as np
from scipy.optimize import fsolve

acetone = (14.5463, 2940.46, 237.22)
acetonitrile = (14.2724, 2945.47,224)
nitromethane = (14.2043, 2972.64, 209)

def antoine(T, A, B, C):
    T = float(T) # there is some subtle issue that comes up when T is an array,
                 # as passed in from fsolve. It needs to be a float, or you get
                 # the wrong answer.
    return np.exp(A - B / (T + C))

x = np.array([0.3, 0.45, 0.25])
P = 80

def objective(T):
    Pvap = np.array([antoine(T, *pars) for pars in [acetone, acetonitrile, nitromethane]])
    y = x * Pvap / P
    return 1 - y.sum()

Tans, = fsolve(objective, 70)

# This is where we end up repeating code
Pvap = np.array([antoine(Tans, *pars) for pars in [acetone, acetonitrile, nitromethane]])
y = x * Pvap / P

print(f'The bubble point temperature is {Tans:1.2f} degC, and the gas phase compositions are {np.round(y, 4)}.')
The bubble point temperature is 68.60 degC, and the gas phase compositions are [ 0.5196  0.3773  0.1031].


This solution works fine, but there is in my opinion, an issue with the small amount of repeated code at the end that is required to get the composition of the gas-phase. This is a small problem here, but as the problems get bigger it is more and more tedious to correctly repeat all the code to see what the state of a system is at the solution, and it seems wasteful to have to repeat the computations; they were known in the objective function. In the following subsections, I explore some alternative approaches to reduce the repetition.

1 First approach

There are two small chunks of repeated code in the example above. One way to minimize the amount of repeated code is to pull these out into reusable functions. Here, we do that, and only have to repeat one function call at the end to get the system composition out.

import numpy as np
from scipy.optimize import fsolve

acetone = (14.5463, 2940.46, 237.22)
acetonitrile = (14.2724, 2945.47,224)
nitromethane = (14.2043, 2972.64, 209)

def antoine(T, A, B, C):
    T = float(T) # there is some subtle issue that comes up when T is an array,
                 # as passed in from fsolve. It needs to be a float, or you get
                 # the wrong answer.
    return np.exp(A - B / (T + C))

x = np.array([0.3, 0.45, 0.25])
P = 80

def Pvap(T):
    return np.array([antoine(T, *pars) for pars in [acetone, acetonitrile, nitromethane]])

def y(T):
    return x * Pvap(T) / P

def objective(T):
    return 1 - y(T).sum()

Tans, = fsolve(objective, 70)

yans = y(Tans) # minimal repetition of a calculation to get the composition state.

print(f'The bubble point temperature is {Tans:1.2f} degC, and the gas phase compositions are {np.round(yans, 4)}.')
The bubble point temperature is 68.60 degC, and the gas phase compositions are [ 0.5196  0.3773  0.1031].


That is a small improvement. The code is not much shorter, just reorganized for easier reuse. It would be easy in this case to also get the vapor pressures of each species at this temperature, just by calling the Pvap function. Still, it feels annoying we have to recalculate the answer to something you know must have already been known when the objective function was evaluated.

2 Second approach - use a state dictionary as an arg in the objective function

In this approach, we will use a dictionary to store the state of the objective function. The dictionary will be in the global namespace, and we will just update it each time the objective function is called.

import numpy as np
from scipy.optimize import fsolve

acetone = (14.5463, 2940.46, 237.22)
acetonitrile = (14.2724, 2945.47,224)
nitromethane = (14.2043, 2972.64, 209)

def antoine(T, A, B, C):
    return np.exp(A - B / (T + C))

x = np.array([0.3, 0.45, 0.25])

state = {}

P = 80


def objective(T, state):
    T = float(T)
    Pvap = np.array([antoine(T, *pars) for pars in [acetone, acetonitrile, nitromethane]])
    y = x * Pvap / P
    state.update({'y': y,
                  'T':  T,
                  'Pvap': Pvap,
                  'z': 1 - y.sum()})
    return state['z']

Tans, = fsolve(objective, 70, args=(state,))

print(f'The bubble point temperature is {Tans:1.2f} degC, and the gas phase compositions are {np.round(state["y"], 4)}.')
print(Tans- state['T']) # check to make sure last value from objective is the same as the solution
state
The bubble point temperature is 68.60 degC, and the gas phase compositions are [ 0.5196  0.3773  0.1031].
0.0


{'Pvap': array([ 138.5620209 ,   67.07966082,   32.98218545]),
 'T': 68.60064626680659,
 'y': array([ 0.51960758,  0.37732309,  0.10306933]),
 'z': -3.4194869158454821e-14}

What we see in the state dictionary is the result from the last time that the objective function was called. It appears that the list time it was called is also where the solution comes from, so the other variables stored here should be consistent. Now you can see we have access to both the Pvap and y composition data from the solution without needing any further computations. This approach could be easily extended to store any derived quantities that represent internal states you want. We don't store any history in this, but you could by appending to lists in the dictionary.

One feature of this is the state dictionary is updated by side effect, and you have to use the state dictionary as an argument parameter to the function.

3 third approach - a callable object

A standard approach to tracking state data is to encapsulate it in a class. fsolve requires a callable function that returns zero at the solution. It is possible to make an object act like a callable function if we define a __call__ method on it. Then, in this method, we can set attributes on the object to keep track of the state, similar to what we did with the dictionary. Since we have a class, we can define some other special dunder methods, e.g. to print the solution. Here is one implementation.

import numpy as np
from scipy.optimize import fsolve

class Objective(object):
    acetone = (14.5463, 2940.46, 237.22)
    acetonitrile = (14.2724, 2945.47,224)
    nitromethane = (14.2043, 2972.64, 209)

    def __init__(self, x, P):
        self.x = np.array(x)
        self.P = P

    def antoine(self, T, A, B, C):
        return np.exp(A - B / (T + C))

    def __str__(self):
        s = f'The bubble point temperature is {self.T:1.2f} degC, and the gas phase compositions are {np.round(self.y, 4)}.'
        return s

    def __call__(self, T):
        T = float(T)
        self.T = T
        self.Pvap = np.array([self.antoine(T, *pars) for pars in [self.acetone, self.acetonitrile, self.nitromethane]])
        self.y = self.x * self.Pvap / self.P
        return 1 - self.y.sum()

obj = Objective(x=np.array([0.3, 0.45, 0.25]), P=80)
ans, = fsolve(obj, 60)

print(obj)
The bubble point temperature is 68.60 degC, and the gas phase compositions are [ 0.5196  0.3773  0.1031].


Similar to the state dictionary approach, there is no repeated code here, and no repeated evaluations to get to the state after the solution. This is a bit more advanced Python than the state dictionary. Note, this implementation doesn't have any checking in it, so if you try to print the object before calling fsolve, you will get an error because the attributes don't exist until after the object has been called. That is also an issue with the state dictionary above.

There are many choices you could make in constructing this example. Maybe this one has gone too far in encapsulating the antoine function as a method. That limits its reusability for another problem. On the other hand, you can reuse it for any other pressure or liquid composition of acetone, acetonitrile and nitromethane very readily.

4 Summary

We looked at three ways to reduce having redundant code in the solution to problems involving nonlinear algebra. The first approach is conceptually simple; you break out as much as you can into reusable functions, and then at most have repeated function calls. These computations are usually not expensive, so repeating them is mostly tedious and provides opportunities for mistakes. This is probably what I will stick to for teaching students that are just seeing this for the first time.

The second approach used a dictionary (other data structures could work too) as an argument to the objective function, and internal states were kept in the dictionary so that after the problem was solved, you have immediate access to them. This is more advanced than the first approach because it requires understanding that the dictionary is modified as a side effect of solving the problem.

Finally, we considered an object-oriented class encapsulation of the information we wanted. I consider this the most advanced Python solution, since it requires some understanding of classes, dunder methods and attributes, and how to make an instance of a class.

The last two methods seem like candidates for an advanced class in problem solving. Thoughts?

Copyright (C) 2018 by John Kitchin. See the License for information about copying.

org-mode source

Org-mode version = 9.1.13

Discuss on Twitter

Literate programming with python doctests

| categories: orgmode, python, noweb | tags:

On the org-mode mailing list we had a nice discussion about using noweb and org-mode in literate programming. The results of that discussion were blogged about here. I thought of a different application of this for making doctests in Python functions. I have to confess I have never liked these because I have always thought they were a pain to write since you basically have to put code and results into a docstring. The ideas developed in the discussion above led me to think of a new way to write these that seems totally reasonable.

The idea is just to put noweb placeholders in the function docstring for the doctests. The placeholders will be expanded when you tangle the file, and they will get their contents from other src-blocks where you have written and run examples to test them.

This video might make the rest of this post easier to follow:

I will illustrate the idea using org-mode and the ob-ipython I have in scimax. The defaults of my ob-ipython setup are not useful for this example because it puts the execution count and mime types of output in the output. These are not observed in a REPL, and so we turn this off by setting these variables.

(setq ob-ipython-suppress-execution-count t
      ob-ipython-show-mime-types nil)

Now, we make an example function that takes a single argument and returns one divided by that argument. This block is runnable, and the function is then defined in the jupyter kernel. The docstring contains several noweb references to doctest blocks we define later. For now, they don't do anything. See The noweb doctest block section for the block that is used to expand these. This block also has a tangle header which indicates the file to tangle the results to. When I run this block, it is sent to a Jupyter kernel and saved in memory for use in subsequent blocks.

Here is the block with no noweb expansion. Note that this is easier to read in the original org source than it is to read in the published blog format.

def func(a):
    """A function to divide one by a.

    <<doctest("doctest-1")>>

    <<doctest("doctest-2")>>

    <<doctest("doctest-3")>>

    Returns: 1 / a.
    """
    return 1 / a

Now, we can write a series of named blocks that define various tests we might want to use as doctests. You can run these blocks here, and verify they are correct. Later, when we tangle the document, these will be incorporated into the tangled file in the docstring we defined above.

func(5) == 0.2
True

This next test will raise an Exception, and we just run it to make sure it does.

func(0)

ZeroDivisionErrorTraceback (most recent call last)
<ipython-input-6-ba0cd5a88f0a> in <module>()
----> 1 func(0)

<ipython-input-1-eafd354a3163> in func(a)
     18     Returns: 1 / a.
     19     """
---> 20     return 1 / a

ZeroDivisionError: division by zero

This is just a doctest with indentation to show how it is used.

for i in range(1, 4):
    print(func(i))
1.0
0.5
0.3333333333333333


That concludes the examples I want incorporated into the doctests. Each one of these blocks has a name, which is used as an argument to the noweb references in the function docstring.

1 Add a way to run the tests

This is a common idiom to enable easy running of the doctests. This will get tangled out to the file.

if __name__ == "__main__":
    import doctest
    doctest.testmod()

2 Tangle the file

So far, the Python code we have written only exists in the org-file, and in memory. Tangling is the extraction of the code into a code file.

We run this command, which extracts the code blocks marked for tangling, and expands the noweb references in them.

(org-babel-tangle)
test.py

Here is what we get:

def func(a):
    """A function to divide one by a.

    >>> func(5) == 0.2
    True

    >>> func(0)
    Traceback (most recent call last):
    ZeroDivisionError: division by zero

    >>> for i in range(1, 4):
    ...     print(func(i))
    1.0
    0.5
    0.3333333333333333


    Returns: 1 / a.
    """
    return 1 / a

if __name__ == "__main__":
    import doctest
    doctest.testmod()

That looks like a reasonable python file. You can see the doctest blocks have been inserted into the docstring, as desired. The proof of course is that we can run these doctests, and use the python module. We show that next.

3 Run the tests

Now, we can check if the tests pass in a fresh run (i.e. not using the version stored in the jupyter kernel.) The standard way to run the doctests is like this:

python test.py -v

Well, that's it! It worked fine. Now we have a python file we can import and reuse, with some doctests that show how it works. For example, here it is in a small Python script.

from test import func
print(func(3))
0.3333333333333333

There are surely some caveats to keep in mind here. This was just a simple proof of concept idea that isn't tested beyond this example. I don't know how many complexities would arise from more complex doctests. But, it seems like a good idea to continue pursuing if you like using doctests, and like using org-mode and interactive/literate programming techniques.

It is definitely an interesting way to use noweb to build up better code files in my opinion.

4 The noweb doctest block

These blocks are used in the noweb expansions. Each block takes a variable which is the name of a block. This block grabs the body of the named src block and formats it as if it was in a REPL.

We also grab the results of the named block and format it for the doctest. We use a heuristic to detect Tracebacks and modify the output to be consistent with it. In that case we assume the relevant Traceback is on the last line.

Admittedly, this does some fragile feeling things, like trimming whitespace here and there to remove blank lines, and quoting quotes (which was not actually used in this example), and removing the ": " pieces of ob-ipython results. Probably other ways of running the src-blocks would not be that suitable for this.

(org-babel-goto-named-src-block name)
(let* ((src (s-trim-right (org-element-property :value (org-element-context))))
       (src-lines (split-string src "\n"))
       body result)
  (setq body
        (s-trim-right
         (s-concat ">>> " (car src-lines) "\n"
                   (s-join "\n" (mapcar (lambda (s)
                                          (concat "... " s))
                                        (cdr src-lines))))))
  ;; now the results
  (org-babel-goto-named-result name)
  (let ((result (org-element-context)))
    (setq result
          (thread-last
              (buffer-substring (org-element-property :contents-begin result)
                                (org-element-property :contents-end result))
            (s-trim)
            ;; remove ": " from beginning of lines
            (replace-regexp-in-string "^: *" "")
            ;; quote quotes
            (replace-regexp-in-string "\\\"" "\\\\\"")))
    (when (string-match "Traceback" result)
      (setq result (format
                    "Traceback (most recent call last):\n%s"
                    (car (last (split-string result "\n"))))))
    (concat body "\n" result)))

Copyright (C) 2018 by John Kitchin. See the License for information about copying.

org-mode source

Org-mode version = 9.1.13

Discuss on Twitter

More auto-differentiation goodness for science and engineering

| categories: autograd, python | tags:

In this post I continue my investigations in the use of auto-differentiation via autograd in scientific and mathematical programming. The main focus of today is using autograd to get derivatives that either have mathematical value, eg. accelerating root finding, or demonstrating mathematical rules, or scientific value, e.g. the derivative is related to a property, or illustrates some constraint.

All the code in this post relies on these imports:

import autograd.numpy as np
from autograd import grad, jacobian

In the following sections I explore some applications in calculus, root-finding, materials and thermodynamics.

1 Showing mixed partial derivatives are equal

In calculus, we know that if we have a well-behaved function \(f(x, y)\), then it should be true that \(\frac{\partial^2f}{\partial x \partial y} = \frac{\partial^2f}{\partial y \partial y}\).

Here we use autograd to compute the mixed partial derivatives and show for 10 random points that this statement is true. This doesnt' prove it for all points, of course, but it is easy to prove for any point of interest.

def f(x, y):
    return x * y**2

dfdx = grad(f)
d2fdxdy = grad(dfdx, 1)

dfdy = grad(f, 1)
d2fdydx = grad(dfdy)

x = np.random.rand(10)
y = np.random.rand(10)

T = [d2fdxdy(x1, y1) == d2fdydx(x1, y1) for x1, y1 in zip(x, y)]

print(np.all(T))

True

2 Root finding with jacobians

fsolve often works fine without access to derivatives. In this example from here, we solve a set of equations with two variables, and it takes 21 iterations to reach the solution.

from scipy.optimize import fsolve

def f(x):
    return np.array([x[1] - 3*x[0]*(x[0]+1)*(x[0]-1),
                     .25*x[0]**2 + x[1]**2 - 1])


ans, info, flag, msg = fsolve(f, (0.5, 0.5), full_output=1)
print(ans)
print(info['nfev'])

[ 1.117 0.83 ] 21

If we add the jacobian, we get the same result with only 15 iterations, about 1/3 fewer iterations. If the iterations are expensive, this might save a lot of time.

df = jacobian(f)
x0 = np.array([0.5, 0.5])

ans, info, flag, msg  = fsolve(f, x0, fprime=df, full_output=1)
print(ans)
print(info['nfev'])

[ 1.117 0.83 ] 15

There is a similar example provided by autograd.

3 Getting the pressure from a solid equation of state

In this post we described how to fit a solid equation of state to describe the energy of a solid under isotropic strain. Now, we can readily compute the pressure at a particular volume from the equation:

\(P = -\frac{dE}{dV}\)

We just need the derivative of this equation:

\(E = E_0+\frac{B_0 V}{B'_0}\left[\frac{(V_0/V)^{B'_0}}{B'_0-1}+1\right]-\frac{V_0 B_0}{B'_0-1}\)

or we use autograd to get it for us.

E0, B0, BP, V0 = -56.466,   0.49,    4.753,  16.573

def Murnaghan(vol):
    E = E0 + B0 * vol / BP * (((V0 / vol)**BP) / (BP - 1.0) + 1.0) - V0 * B0 / (BP - 1.)
    return E

def P(vol):
    dEdV = grad(Murnaghan)
    return -dEdV(vol) * 160.21773  # in Gpa

print(P(V0)) # Pressure at the minimum
print(P(0.99 * V0))  # Compressed
4.44693531998e-15
0.808167684691

So it takes positive pressure to compress the system, as expected, and at the minimum the pressure is equal to zero. Seems pretty clear autograd is better than deriving the required pressure derivative.

4 Deriving activity coefficients and demonstration of the Gibbs-Duhem relation

Thermodynamics tells us that in a binary mixture the following is true:

\(0 = x_1 \frac{d \ln \gamma_1}{dx_1} + (1 - x_1) \frac{d \ln \gamma_2}{dx_1}\)

In other words, the activity coefficients of the two species can't be independent.

Suppose we have the Margules model for the excess free energy:

\(G^{ex}/RT = n x_1 (1 - x_1) (A_{21} x_1 + A_{12} (1 - x_1))\)

where \(n = n_1 + n_2\), and \(x_1 = n1 / n\), and \(x_2 = n_2 / n\).

From this expression, we know:

\(\ln \gamma_1 = \frac{\partial G_{ex}/RT}{\partial n_1}\)

and

\(\ln \gamma_2 = \frac{\partial G_{ex}/RT}{\partial n_2}\)

It is also true that (the Gibbs-Duhem equation):

\(0 = x_1 \frac{d \ln \gamma_1}{d n_1} + x_2 \frac{d \ln \gamma_2}{d n_1}\)

Here we will use autograd to get these derivatives, and demonstrate the Gibbs-Duhem eqn holds for this excess Gibbs energy model.

A12, A21 = 2.04, 1.5461  # Acetone/water https://en.wikipedia.org/wiki/Margules_activity_model

def GexRT(n1, n2):
    n = n1 + n2
    x1 = n1 / n
    x2 = n2 / n
    return n * x1 * x2 * (A21 * x1 + A12 * x2)

lngamma1 = grad(GexRT)     # dGex/dn1
lngamma2 = grad(GexRT, 1)  # dGex/dn2

n1, n2 = 1.0, 2.0
n = n1 + n2
x1 = n1 / n
x2 = n2 / n

# Evaluate the activity coefficients
print('AD:         ',lngamma1(n1, n2), lngamma2(n1, n2))

# Compare that to these analytically derived activity coefficients
print('Analytical: ', (A12 + 2 * (A21 - A12) * x1) * x2**2, (A21 + 2 * (A12 - A21) * x2) * x1**2)

# Demonstration of the Gibbs-Duhem rule
dg1 = grad(lngamma1)
dg2 = grad(lngamma2)

n = 1.0 # Choose a basis number of moles
x1 = np.linspace(0, 1)
x2 = 1 - x1
n1 = n * x1
n2 = n - n1

GD = [_x1 * dg1(_n1, _n2) + _x2 * dg2(_n1, _n2)
      for _x1, _x2, _n1, _n2 in zip(x1, x2, n1, n2)]

print(np.allclose(GD, np.zeros(len(GD))))
('AD:         ', 0.76032592592592585, 0.24495925925925932)
('Analytical: ', 0.760325925925926, 0.24495925925925924)
True

That is pretty compelling. The autograd derivatives are much easier to code than the analytical solutions (which also had to be derived). You can also see that the Gibbs-Duhem equation is satisfied for this model, at least with a reasonable tolerance for the points we evaluated it at.

5 Summary

Today we examined four ways to use autograd in scientific or mathematical programs to replace the need to derive derivatives by hand. The main requirements for this to work are that you use the autograd.numpy module, and only the functions in it that are supported. It is possible to add your own functions (described in the tutorial) if needed. It seems like there are a lot of opportunities for scientific programming for autograd.

Copyright (C) 2017 by John Kitchin. See the License for information about copying.

org-mode source

Org-mode version = 9.1.2

Discuss on Twitter

Timing Lennard-Jones implementations - ASE vs autograd

| categories: lennardjones, autograd, python | tags:

Table of Contents

In a comment on this post Konrad Hinsen asked if the autograd forces on a Lennard-Jones potential would be useable in production. I wasn't sure, and was suspicious that analytical force functions would be faster. It turns out to not be so simple. In this post, I attempt to do some timing experiments for comparison. These are tricky to do right, and in a meaningful way, so I will start by explaining what is tricky and why I think the results are meaningful.

The ASE calculators cache their results, and return the cached results after the first run. We will do these on a 13-atom icosahedron cluster.

from ase.calculators.lj import LennardJones
from ase.cluster.icosahedron import Icosahedron

atoms = Icosahedron('Ar', noshells=2, latticeconstant=3)
atoms.set_calculator(LennardJones())

import time
t0 = time.time()
print('energy: ', atoms.get_potential_energy())
print(' time: ', time.time() - t0)
print()

t0 = time.time()
print('energy: ', atoms.get_potential_energy())
print(' time: ', time.time() - t0)
print()

atoms.calc.results = {}
t0 = time.time()
print('energy: ', atoms.get_potential_energy())
print('time: ', time.time() - t0)
energy:  -1.25741774649
 time:  0.0028629302978515625

energy:  -1.25741774649
 time:  0.00078582763671875

energy:  -1.25741774649
time:  0.0031850337982177734

Note the approximate order of magnitude reduction in elapsed time for the second call. After that, we reset the calculator results, and the time goes back up. So, we have to incorporate that into our timing. Also, in the ASE calculator, the forces are simultaneously calculated. There isn't a way to separate the calls. I am going to use the timeit feature in Ipython for the timing. I don't have a lot of control over what else is running on my machine, so I have observed some variability in the timing results. Finally, I am running these on a MacBook Air.

%%timeit
atoms.get_potential_energy()
atoms.calc.results = {} # this resets it so it runs each time. Otherwise, we get cached results

1.46 ms ± 107 µs per loop (mean ± std. dev. of 7 runs, 1000 loops each)

That seems like a surprisingly long time. If you neglect the calculator reset, it looks about 10 times faster because the cache lookup is fast!

Let's compare that to an implementation of the Lennard-Jones potential similar to the last time. This implementation differs from the first one I blogged about. This one is fully vectorized. It still does not support periodic boundary conditions though. This version may be up to 10 times faster than the previous version. I haven't tested this very well, I only assured it gives the same energy as ASE for the example in this post.

import autograd.numpy as np

def energy(positions):
    "Compute the energy of a Lennard-Jones system."
    
    sigma = 1.0
    epsilon = 1.0
    rc = 3 * sigma

    e0 = 4 * epsilon * ((sigma / rc)**12 - (sigma / rc)**6)
    
    natoms = len(positions)
    # These are the pairs of indices we need to compute distances for.
    a, b = np.triu_indices(natoms, 1)

    d = positions[a] - positions[b]
    r2 = np.sum(d**2, axis=1)
    c6 = np.where(r2 <= rc**2, (sigma**2 / r2)**3, np.zeros_like(r2))
    
    energy = -e0 * (c6 != 0.0).sum()
    c12 = c6**2
    energy += np.sum(4 * epsilon * (c12 - c6))
    
    return energy

# Just to check we get the same answer
print(energy(atoms.positions))

-1.25741774649

The energy looks good. For timing, we store the positions in a variable, in case there is any lookup time, since this function only needs an array.

pos = atoms.positions

There is no caching to worry about here, we can just get the timing.

%%timeit
energy(pos)

82.2 µs ± 2.85 µs per loop (mean ± std. dev. of 7 runs, 10000 loops each)

Wow, that is a lot faster than the ASE implementation. Score one for vectorization.

print('Vectorized is {0:1.1f} times faster than ASE at energy.'.format(1.46e-3 / 82.5e-6))
Vectorized is 17.7 times faster than ASE at energy.

Yep, a fully vectorized implementation is a lot faster than the ASE version which uses loops. So far the difference has nothing to do with autograd.

1 Timing on the forces

The forces are where derivatives are important, and it is a reasonable question of whether hand-coded derivatives are faster or slower than autograd derivatives. We first look at the forces from ASE. The analytical forces take about the same time as the energy, which is not surprising. The same work is done for both of them.

np.set_printoptions(precision=3, suppress=True)
print(atoms.get_forces())
[[-0.    -0.    -0.   ]
 [-0.296 -0.     0.183]
 [-0.296 -0.    -0.183]
 [ 0.296 -0.     0.183]
 [ 0.296 -0.    -0.183]
 [ 0.183 -0.296 -0.   ]
 [-0.183 -0.296  0.   ]
 [ 0.183  0.296 -0.   ]
 [-0.183  0.296  0.   ]
 [-0.     0.183 -0.296]
 [ 0.    -0.183 -0.296]
 [-0.     0.183  0.296]
 [ 0.    -0.183  0.296]]

%%timeit
atoms.get_forces()
atoms.calc.results = {}
1.22 ms ± 38.7 µs per loop (mean ± std. dev. of 7 runs, 1000 loops each)

Here is our auto-differentiated force function.

from autograd import elementwise_grad

def forces(pos):
    dEdR = elementwise_grad(energy)
    return -dEdR(pos)

Let's just check the forces for consistency.

print(forces(atoms.positions))

print(np.allclose(forces(atoms.positions), atoms.get_forces()))
[[-0.    -0.    -0.   ]
 [-0.296 -0.     0.183]
 [-0.296 -0.    -0.183]
 [ 0.296 -0.     0.183]
 [ 0.296 -0.    -0.183]
 [ 0.183 -0.296 -0.   ]
 [-0.183 -0.296  0.   ]
 [ 0.183  0.296 -0.   ]
 [-0.183  0.296  0.   ]
 [-0.     0.183 -0.296]
 [ 0.    -0.183 -0.296]
 [-0.     0.183  0.296]
 [ 0.    -0.183  0.296]]
True

Those all look the same, so now performance for that:

%%timeit 

forces(pos)
727 µs ± 47.1 µs per loop (mean ± std. dev. of 7 runs, 1000 loops each)

This is faster than the ASE version. I suspect that it is largely because of the faster, vectorized algorithm overall.

print('autograd is {0:1.1f} times faster than ASE on forces.'.format(1.22e-3 / 727e-6))
autograd is 1.7 times faster than ASE on forces.

autograd forces are consistently 2-6 times faster than the ASE implementation. It could be possible to hand-code a faster function for the forces, if it was fully vectorized. I spent a while seeing what would be required for that, and it is not obvious how to do that. Any solution that uses loops will be slower I think.

This doesn't directly answer the question of whether this can work in production. Everything is still written in Python here, which might limit the size and length of calculations you can practically do. With the right implementation though, it looks promising.

Copyright (C) 2017 by John Kitchin. See the License for information about copying.

org-mode source

Org-mode version = 9.1.2

Discuss on Twitter
« Previous Page -- Next Page »