Separating code blocks from results in org-mode

| categories: org-mode | tags:

I often put my code blocks right where I need them in my org documents. It usually has a section explaining what I want to do, then the code block that implements the idea, following by the output. Sometimes the code blocks are long, however, and it might be desirable for that code to be in an appendix. 1

Org-mode enables this with #+CALL. For example, I have a function named circle-area in the appendix of this post that calculates the area of a circle given its radius. The function is "named" by a line like this:

#+name: function-name

I can use the function like this:

#+CALL: circle-area(1)
3.14159265359

That is pretty nice. You can separate the code out from the main document. You still have to put the #+CALL: line in though. It may be appropriate to put a call inline with your text. If you add the following sentence, and put your cursor on the callcircle-area and press C-c C-c, the output is put in verbatim markers right after it.

The area of a circle with unit radius is call_circle-area(1).

The area of a circle with unit radius is 3.14159265359.

Here is another interesting way to do it. We can specify a named results block. Let us consider another function named hello-block that prints output. We specify a named results block like this:

#+RESULTS: function-name

Now, whenever you execute that block, the results will get put where this line is like this.

hello John

These could be useful approaches to making the "top" of your document cleaner, with less code in it. The code of course is still in the document, but at the end, in an appendix for example. This kind of separation might make it a little harder to find the code, and to reevaluate it,2 but it might improve the readability for others.

1 Appendix of code

1.1 Area of a circle

import numpy as np
return np.pi * r**2

1.2 Hello function

print 'hello ' + name

Footnotes:

1

I know I can pretty conveniently collapse a code block by pressing tab on the header. Sometimes that is not enough.

2

It is not much harder, C-s will let you search for the named block. I do not know if there are nice convenient navigation commands for this.

Copyright (C) 2014 by John Kitchin. See the License for information about copying.

org-mode source

Org-mode version = 8.2.5h

Discuss on Twitter

Add time to a deadline

| categories: org-mode | tags:

Table of Contents

I have an application where an org-file is a template with some due dates in it. I would like to update the deadlines to make them all relative to today. In this post I explore a way to do that. The strategy is to find deadlines, parse the time out of the time stamp, add an appropriate amount of time, and replace the time stamp. For this exercise, we use this org-file, which has one DEADLINE of "2014-01-13 Mon", and I want to add 60 days to the time stamp.

Amazingly, emacs can parse time strings into a format that it can understand. I do not claim to understand what this function returns, but it is some representation of time that emacs understands.

(date-to-time "<2014-01-13 Mon>")

(21203 11392)

Now, we can add time to that format. Let us say I want to add 60 days. In emacs, we add seconds to a time, so 60 days is 60 days * 24 hours * 60 minutes * 60 seconds, or in elisp: (* 60 24 60 60).

(let ((sixty-days (seconds-to-time (* 60 24 60 60))))
  (time-add (date-to-time "<2014-01-13 Mon>") sixty-days))

(21282 18048 0 0)

That does not make too much sense, so we can use another function to format it like a new time stamp.

(let ((sixty-days (seconds-to-time (* 60 24 60 60))))
  (format-time-string "<%Y-%m-%d %a>"
                      (time-add (date-to-time "<2014-01-13 Mon>") sixty-days)))

<2014-03-13 Thu>

Beautiful. We just got a timestamp that is 60 days later than the original timestamp. Now we just search forward to find deadline, get the time stamp, add the time to it, and replace the line. I specifically want to change deadlines, so we will develop a regular expression for that. Here is a block that searches forward for a DEADLINE, parses it, adds 60 days to it, and replaces the deadline. The regular expression is limited to timestamps that look like <yyyy-mm-dd day>, i.e. no warnings or repeaters are found. In this post, there is subheading that looks like this initially:

#+BEGINEXAMPLE

1 s1

#+ENDEXAMPLE

(progn
  (save-excursion
    ;; go to timestamp
    (re-search-forward "DEADLINE:\\s-*<\\(\\([0-9]\\{4\\}\\)-\\([0-9]\\{2\\}\\)-\\([0-9]\\{2\\}\\)\\s-\\(Mon\\|Tue\\|Wed\\|Thu\\|Fri\\|Sat\\|Sun\\)\\)>")
    (let ((ts (match-string 1)) ;; this is the timestamp
          (sixty-days (seconds-to-time (* 60 24 60 60)))
          (new-ts))
      (setq new-ts (format-time-string "    DEADLINE: <%Y-%m-%d %a>"
                                       (time-add (date-to-time ts) sixty-days)))
      ;; now we kill the old time stamp, and insert the new one
      (beginning-of-line)
      (kill-line)
      (insert new-ts))))

After we run the code above, the deadline looks like this: #+BEGINEXAMPLE

2 s1

#+ENDEXAMPLE

We succeeded in moving it by 60 days. An interesting application of this would be to make all the deadlines in an org-file relative to some baseline date. For example, you have a series of deadlines for assignments throughout a semester, and it would be tedious to update these by hand. Suppose you could just establish a new beginning date, and make all deadlines relative to that date with a command. That seems useful.

3 s1

Copyright (C) 2014 by John Kitchin. See the License for information about copying.

org-mode source

Org-mode version = 8.2.5h

Discuss on Twitter

Literate programming example with Fortran and org-mode

| categories: literate-programming, org-mode | tags:

Update: see a short video of how this post works here: video

I want to illustrate the literate programming capabilities of org-mode. One idea in literate programming is to have code in blocks surrounded by explanatory text. There is a process called "tangling", which extracts the code, and possibly compiles and runs it. I have typically used python and emacs-lisp in org-mode, but today we look at using Fortran.

The first simple example is a hello world fortran program. Typically you create a file containing code like this:

PROGRAM hello

PRINT *, "Hello world"

END PROGRAM hello

That file can be named something like hello.f90. We specify that in the source block header like this:

:tangle hello.f90

There are a variety of ways to build your program. Let us create a makefile to do it. We will specify that this block is tangled to a Makefile like this:

:tangle Makefile

Our Makefile will have three targets:

  1. hello, which compiles our program to an executable called a.out.
  2. execute, which depends on hello, and runs the executable
  3. clean, which deletes a.out if it exists
hello:  hello.f90
        gfortran hello.f90

execute: hello
        ./a.out

clean:
        rm -f a.out *.o

Now, we can run

elisp:(org-babel-tangle)
, which will extract these files to the current directory. Here is evidence that the files exist.

ls
hello.f90
literate.org
Makefile

Let us go a step further, and use the makefile to execute our program. The first time you run this, you will see that the

make clean execute
rm -f a.out *.o
gfortran hello.f90
./a.out
 Hello world

That works well! The only really inconvenient issue is that if you update the Fortran code above, you have to manually rerun

elisp:(org-babel-tangle)
, then run the make execute command. We can combine that in a single block, where you do both things at once.

(org-babel-tangle)
(shell-command-to-string "make clean execute")
rm -f a.out *.o
gfortran hello.f90
./a.out
 Hello world

That is it in a nutshell. We had a source block for a Fortran program, and a source block for the Makefile. After tangling the org-file, we have those files available for us to use. Next, let us consider a little more complicated example.

1 A slightly more complicated example.

Now, let us consider a Fortran code with two files. We will define a module file, and a program file. The module file contains a function to compute the area of a circle as a function of its radius. Here is our module file, which is tangled to circle.f90.

MODULE Circle
      implicit None
      public :: area
contains
      function area(r) 
      implicit none
      real, intent(in) :: r
      real :: area
      area = 3.14159 * r**2
      return
      end function area
END MODULE Circle

Now, we write a program that will print a table of circle areas. Here we hard-code an array of 5 radius values, then loop through the values and get the area of the circle with that radius. We will print some output that generates an org-mode table . In this program, we use our module defined above.

program main
      
use circle, only: area

implicit none
integer :: i
REAL, DIMENSION(5) :: R
R = (/1.0, 2.0, 3.0, 4.0, 5.0 /)

print *, "#+tblname: circle-area"
do i = 1, 5
  print *, "|", R(i), "|", area(R(i)), "|"
end do

end program main

Now, we make a makefile that will build this program. I use a different name for the file, since we already have a Makefile in this directory from the last example. I also put @ at the front of each command in the makefile to suppress it from being echoed when we run it. Later, we will use the makefile to compile the program, and then run it, and we only want the output of the program.

The compiling instructions are more complex. We have to compile the circle module first, and then the main program. Here is our makefile.

circle:
        @gfortran -c circle.f90

main: circle
        @gfortran -c main.f90
        @gfortran circle.o main.o -o main

clean:
        @rm -f *.o main

Now, we run this block, which tangles out our new files.

(org-babel-tangle)
main.f90 circle.f90 hello.f90 makefile-main Makefile

Note that results above show we have tangled all the source blocks in this file. You can limit the scope of tangling, by narrowing to a subtree, but that is beyond our aim for today.

Finally, we are ready to build our program. We specify the new makefile with the -f option to make. We use the clean target to get rid of old results, and then the main target with builds the program. Since main depends on circle, the circle file is compiled first.

Note in this block I use this header:

#+BEGIN_SRC sh :results raw

That will tell the block to output the results directly in the buffer. I have the fortran code prename the table, and put | around the entries, so this entry is output directly as an org table.

make -f makefile-main clean main
./main
1.000000 3.141590
2.000000 12.56636
3.000000 28.27431
4.000000 50.26544
5.000000 78.53975

It takes some skill getting used to using :results raw. The results are not replaced if you run the code again. That can be inconvenient if you print a very large table, which you must manually delete.

Now that we have a named org table, I can use that table as data in other source blocks, e.g. here in python. You define variables in the header name by referring to the tblname like this.

#+BEGIN_SRC python :var data=circle-area

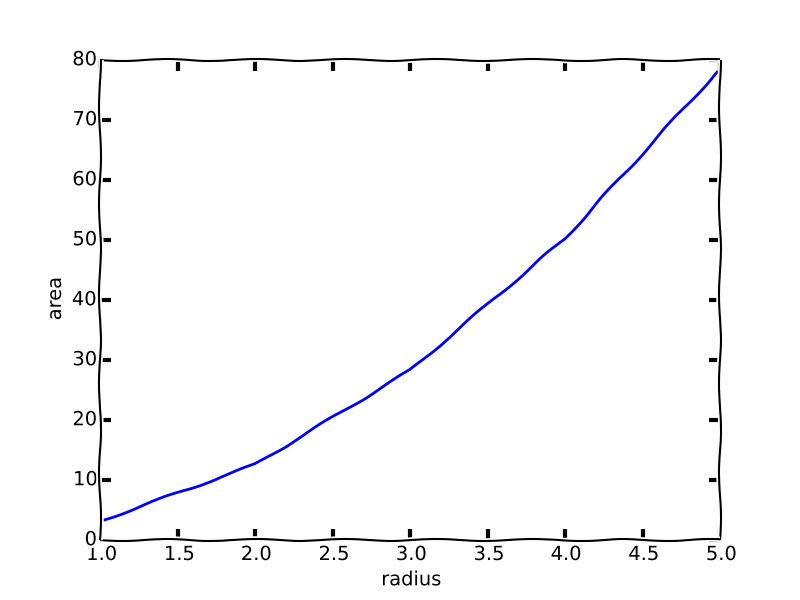
Then, data is available as a variable in your code. Let us try it and plot the area vs. radius here. For more fun, we will make the plot xkcd , so it looks like I sketched it by hand.

import numpy as np
import matplotlib.pyplot as plt
plt.xkcd()

print data # data is a list 
data = np.array(data)
plt.plot(data[:, 0], data[:, 1])
plt.xlabel('radius')
plt.ylabel('area')
plt.savefig('circle-area.png')
[[1.0, 3.14159], [2.0, 12.56636], [3.0, 28.27431], [4.0, 50.26544], [5.0, 78.53975]]

It appears the area increases quadratically with radius. No surprise there! For fun, let us show that. If we divide each area by \(r^2\), we should get back π. Let us do this in emacs-lisp, just to illustrate how flexibly we can switch between languages. In lisp, the data structure will be a list of items like ((radius1 area1) (radius2 area2)…). So, we just map a function that divides the area (the second element of an entry) by the square of the first element. My lisp-fu is only average, so I use the nth function to get those elements. We also load the calc library to get the math-pow function.

(require 'calc)
(mapcar (lambda (x) (/ (nth 1 x) (math-pow (nth 0 x) 2))) data)
3.14159 3.14159 3.14159 3.14159 3.14159

Indeed, we get π for each element, which shows in fact that the area does increase quadratically with radius.

You can learn more about tangling source code from org-mode here http://orgmode.org/manual/Extracting-source-code.html .
2 Summary key points

  1. You can organize source files in org-mode as source blocks which can be "tangled" to "real" source code.
  2. You can build into your org-file(s) even the Makefile, or other building instructions.
  3. You can even run the build program, and the resulting programs from org-mode to capture data.
  4. Once that data is in org-mode, you can reuse it in other source blocks, including other languages.

What benefits could there be for this? One is you work in org-mode, which allows you to structure a document in different ways than code does. You can use headings to make the hierarchy you want. You can put links in places that allow you to easily navigate the document. Second, you can build in the whole workflow into your document, from building to execution. Third, you could have a self-contained file that extracts what someone else needs, but which has documentation and explanation built into it, which you wrote as you developed the program, rather than as an afterthought. You can still edit each block in its native emacs-mode, and have org-mode too. That is something like having cake, and eating it too!

Downsides? Probably. Most IDE/project type environments are designed for code. These tools offer nice navigation between functions and files. I don't use those tools, but I imagine if you are hooked on them, you might have to learn something new this way.

Copyright (C) 2014 by John Kitchin. See the License for information about copying.

org-mode source

Org-mode version = 8.2.5h

Discuss on Twitter

Reproducing the research

| categories: org-mode | tags:

We have over the past year published a few papers using org-mode. You can find one of them here: http://pubs.acs.org/doi/abs/10.1021/ie400582a . There is a corresponding supporting information file that is freely available, which contains within it an org-mode file that documents our work, and that contains the data in it. In this post, I want to explore how easy it is to access that data, and use it. First, download the file:

wget http://pubs.acs.org/doi/suppl/10.1021/ie400582a/suppl_file/ie400582a_si_001.pdf

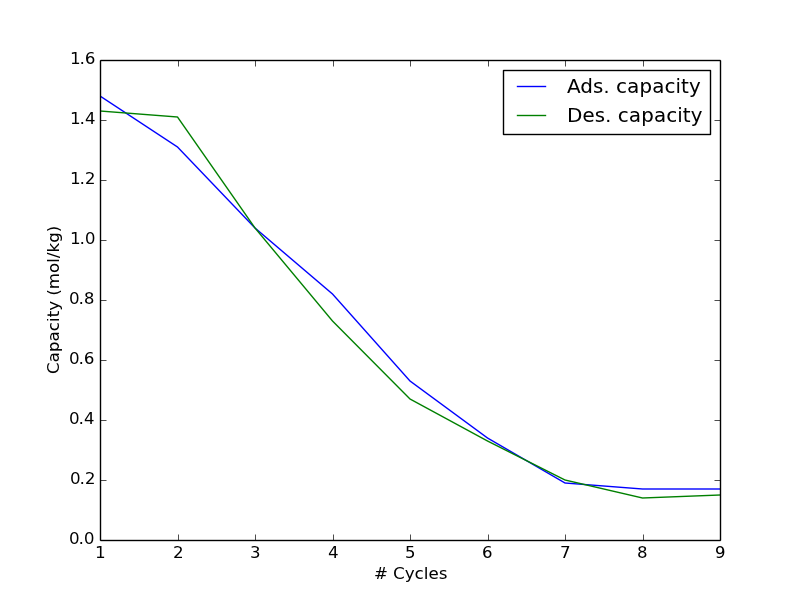
Then, open it in Acrobat Reader, and extract the org-file. I saved it as supporting-information.org . In that file, there is a table of data that is the SO2 adsorption and desorption capacity of a resin as a function of cycles. The table is named so2-capacity-1.

Here is how simple it is to grab that data, and use it. We need to use this header in our source block:

#+BEGIN_SRC python :var data=supporting-information.org:so2-capacity-1

In the block, data will be a list of lists. I like to convert it into a numpy array, so that indexing it is simple to extract out the data.

import numpy as np
data = np.array(data)
cycles = data[:, 0]
ads_cap = data[:, 1]
des_cap = data[:, 2]

import matplotlib.pyplot as plt
plt.plot(cycles, ads_cap, cycles, des_cap)
plt.legend(['Ads. capacity', 'Des. capacity'])
plt.xlabel('# Cycles')
plt.ylabel('Capacity (mol/kg)')
plt.savefig('images/si-image.png')

That is pretty easy. There are also Excel sheets embedded in that supporting information file, along with scripts that illustrate how to use the data in the Excel sheets for further analysis. How about that for data sharing!

Copyright (C) 2014 by John Kitchin. See the License for information about copying.

org-mode source

Org-mode version = 8.2.5h

Discuss on Twitter

Clocking your time in org-mode

| categories: org-mode | tags:

I have some need for tracking how much time I spend on certain jobs, e.g. committees, etc… because 1) I have to report this information, 2) I need a better idea of how much time some things take. Org-mode supports the idea of "clocking in to a task". You run (org-clock-in) in a heading, and it stores a time stamp. You do your work in that heading, and when done, you (org-clock-out).

You can summarize your time with (org-clock-report) which puts a dynamic block in your file like this.

Table 1: Clock summary at [2014-01-26 Sun 13:36]
Headline Time  
Total time 0:24  
Clocking your time in org-mode 0:24  
\__ work in subheadings   0:06
\__ Using clocking effectively   0:05

You can update it by putting your cursor in the #+BEGIN line, and pressing C-c C-c.

1 work in subheadings

It seems that the clock-in mechanism works on the heading you are in. So whenever you clock in, it is specific to that heading. If you clock-in more than once, multiple CLOCK entries are stored, unless you modify org-clock-into-drawer. It seems like you probably want these CLOCK entries in a drawer, so you should put this in your init.el file:

(setq org-clock-into-drawer t)

2 Clock in to the right task

By default, (org-clock-in) creates clocks-in to the current headline. Org-mode seems to store a list of recently clocked tasks. You can access them by typing C-u C-c C-x C-i. You will be given some choices of which task to clock in to. You can switch to another task by doing this too.

3 Using clocking effectively

It will take some discipline and practice to use this effectively. It appears you can clock in any heading, and then use the clock report to aggregate all the times into one summary. That report can have a variety of scopes, from subtree to file. In that case, if you keep all relevant task information to a project in a file, you just clock in wherever you work in that file, and let the report keep track of it for you.

You could use this to track the amount of time you spend reviewing manuscripts, or doing work for a committee. You just need to remember to actually use it!

It might be interesting to setup code that would automatically clock in when you open a file, and then clock out when you close it. Probably this would be done with hooks.

There is a nice map of using org-mode for clocking time here .

Copyright (C) 2014 by John Kitchin. See the License for information about copying.

org-mode source

Org-mode version = 8.2.5g

Discuss on Twitter
« Previous Page -- Next Page »